A
Tutorial - Chainbooting With gPXE and MicroApache
After much time spent studying various approaches - especially this one which I liked
although the exact method didn't work for me - I finally managed to successfully
create a PXE->gPXE chainboot which could
be used to boot something useful. In this case it was TinyCore Linux .
Why do this? Well, gPXE is far more powerful than the standard PXE
network boot which is available from the BIOS boot on most PCs. It has the ability to
"chain-load" (remote execute) using a wider range of network protocols include AoE, iSCSI and HTTP. The latter interested me as it offered
a potential use for MicroApache. The
advantage of HTTP over TFTP which is usually used for PXE transfers is that it is far more
scaleable and can offer much faster rates of data-transfer.
How Does It Work?
Normally, the inbuilt PXE boot to a DHCP server which returns both
an IP address and the location of a boot file. This file is then requested by the PXE|
boot-agent using TFTP
(Trivial File Transfer Protocol). This service being provided by a TFTP server such as TFTPD32 The disadvantages of this is that the
protocol is inefficient and for advanced boot configuration one has to then chain to a
boot-loader service such as GRUB or PXELinux. Often these are limited in terms of what can
be booted, and again there's still the efficiency limitation of the TFTP server.
An alternative method is for the BIOS PXE service to contact the
DHCP server as before and then either load the more-flexible gPXE directly or load say GRUB or PXELinux and
chain to gPXE. I chose the latter method as it allows for a menu to be added. One can run
into problems with a perpetual "circular-boot" whereby PXE loads gPXE, which
makes a DHCP request and then re-loads itself over and over. This can be avoided using
specific DHCP server configuration (not an option with TFTPD32) or by forcing gPXE to
chain into a boot script.
I chose this option, so the next stage was to find a way to make
gPXE always load a local boot script rather than go back and query the DHCP server. In
many examples the boot sequence has been entered manually - I wanted it to be both fully
automatic and customisable. This meant using a local HTTP server to serve a boot script
and the way to force gPXE to load and use a generic remote script was to use the online
custom-boot compiler to create a PXELinux-booting gPXE image (LKRN file) and entering a
standard script into the online compiler at rom-o-matic.net .
It took some time to figure out the syntax for the various
components as I'm not a Linux guru and the documentation is fairly obtuse, However I now
have a complete, turnkey gPXE/HTTP chain-load boot CDROM which can boot Tinycore Linux.
I've added a tutorial on how to achieve this below...
My own TFTPLaunch - auto-launcher and
auto-configurator for TFTPD32 (above)
My own MicroApache portable HTTP
webserver distro - I chose to use Apache 1.3.x rather than 2.x as this is not intended to
be "internet-facing" and offers the most compact and flexible configuration via
the "launch13x" launcher (ZIP ~300kb).
"grldr" from the GRUB for
DOS boot-loader (You can also use PXELinux but you will have to amend the information
to suit)
A compiled gPXE boot ROM image from this site
(see the full-instructions below)
Tail for Windows (Optional - if you want to
view log files and if running from optical media with dynamic MicroApache configuration as
TailCGI won't "see" the logs on %TEMP%)
To carefully follow the instructions below
or ...
You can download
the complete project from MediaFire as an appx. 12Mb ISO image. But BE WARNED this ISO image autoruns TFTPD32 and
MicroApache and will kill any copies of these processes if they are already running on
your PC
Supported Operating Systems
The limitng factor will be TfTPD32 which runs only on more recent
versions of Windows. During testing it emerged that TFTPD32 won't work with
"cut-down" versions of XP such as BartPE,
UBCD4Win and Hiren's Boot CD. Something is missing from
these distros which is required. TFTPD32 won't work on Windows NT. I didn't test it on WINE
It should be able to boot just about any operating system which
gPXE can handle
Precautionary Caveats
Temporary files will be created in your local TEMP folder for
TFTPD32 by TFTPLaunch whether on optical media or not. This is an unfortunate necessity of
a bug on TFTPD32's handling of command-line arguments.
Temporary files will be created in your local TEMP folder for
MicroApache if you opt for dynamic configuration or on optical media with dynamic
configuration. This is necessary as the dynamic configuration required for DocumentRoot,
log files etc has to be written somewhere.
If you use the complete ISO of this project then, again, be aware
it will autoboot. I wanted it to work thsi way so I can use it as a possible recovery
tool.
This method may need tweaking if you have a competing DHCP server
on your own LAN. I had two other DHCP-enabled routers but didn't run into any problems.
First you need to create a suitable folder structure to hold the
all the components as shown in the diagram on the right: The grey
components are optional, the purple relate
to the standard MicroApache 1.3.x distribution
Extract TFTPD32.EXE and place in the root
folder. You don't need the help file.
MicroApache Portable Webserver -
Extract the latest full distro of MicroApache
1.3.37-PXE with launch13x v1.05 (313kb ZIP) into a subfolder under root as shown above
Example/suggested folder-name:\MicroApache-1.3.37-no-PHP
The CGI-BIN log-viewing application components are optional and won't work with if
you choose a non-writeable optical media setup where logs are redirected to %TEMP%. Ensure
you use the custom MicroApache 1.3.x (PXE) with the enhanced v1.05 Apache Loader
(launch13x.exe) if you intend using optical media. This is because the enhanced loader can
dynamically create the server config from a macro template and redirect it to a local TEMP
folder. I rewrote the loader especially for this project. You can check the version using LAUNCH13X.EXE
/?
I chose to have MicroApache use a fully-dynamic configuration based on a
template httpd.conf so that I could ultimately use optical media such as CDROM for the
system with full autorun. This meant rewriting launch13x.exe to handle
redirecting the created config files to %TEMP% and redirecting Apache to
those files. The log files also have to be redirected. This is done, as with several other
parameters using macro-variable interpretation within the template httpd.conf file. Thus,
with this scenario you need to launch MicroApache using launch13x.exe with a parameter
"httpd.conf.dynamic". This file is broadly the same as the distribution
httpd.conf but contains the following modified lines. Both httpd.conf and docroot.conf are
created dynamically and read from %TEMP%..
# Entries in httpd.conf.dynamic
ServerName $ip
include $configdir/docroot.conf
CustomLog $logdir/access.log common
PidFile $logdir/httpd.pid
ErrorLog $logdir/error.log
$ip is the server's IP address, detected automatically $configdir is the source configuration directory, currently
specified by using the /TEMP switch to redirect everything to %TEMP% $logdir is the target, writeable configuration directory,
currently specified by using the /TEMP switch to redirect everything to %TEMP%
Download a Tinycore
Linux distro and extract either from file or ISO the vmlinuz and tinycore.gz
files. Place these in the \WWW folder
Using Notepad or similar text-editor, create the file bootscript.gpxe
in your .\WWW folder and enter the following -
This is the script chain-downloaded by gPXE from our local webserver using the
embedded-script we will create below. It uses the gPXE environment variable
"net0" (first ethernet card) and pulls out the "dhcp-server" property.
gPXE variables are interpreted by wrapping in ${ }
The "root" value took some time to figure out and doesn't make much sense
to me, not being a Linux expert. However none of the recognised partitions which would be
shown on a kernel panic dump (such as sda, sda1, or sr) could be used. I guess the 100
must be addressing a partition by number, this being the gPXE one.
Download GRUB for DOS and extract
the grub loader - grldr - and place in the \PXE
sub-folder
Create a GRUB boot menu as follows and save it to \PXE\MENU.LST\DEFAULT -
# GRUB stub-menu allows for
menu editing/extension
# We set a timeout of x3 seconds and default to 1st menu item (0)
timeout 3
default 0
title TinyCore Linux gPXE/HTTP Chain Load
kernel /gpxe-1.0.1-gpxe.lkrn
Go to http://rom-o-matic.net/gpxe/gpxe-1.0.1/contrib/rom-o-matic/
and select the following -
Step 1) "Choose an output format" Linux Kernel (LKRN)
Step 5) Click the "Customise" button to expand the screen options
Scroll to the bottom of the page and enter the following gPXE script
If you have more than one ethernet interface then you may have to modify the
"net0" value to "net1" or experiment with other settings
Note that the :8800 is required *only* if you are operating MicroApache
on the standard MicroApache port. The default port is 80.
Click "Get Image" at the bottom of the rom-o-matic screen and download this file
to the \PXE directory
Example download filename: gpxe-1.0.1-gpxe.lkrn
Create the master GO.BAT in the root folder as follows.
This will launch all of the Win32 components in the correct sequence
@echo off
REM Start MicroApache ...
REM N.B. Requires launch13x.exe v1.05 (4/Oct/11) to set docroot to ../www
call %~dp0MicroApache-1.3.37-no-PHP\go.bat
REM (re)Start tftpd32 - Beware - this kills any active tftpd32 session...
%~dp0MicroApache-1.3.37-no-PHP\killproc.exe tftpd32.exe
REM Debug open a browser window to confirm server is active...
REM Uncomment this line for use with non-optical media ONLY...
REM start http://localhost:8800/cgi-bin/tailcgi.exe?filename=access.log
REM GRUB for DOS was used for the initial TFTP boot
REM TFTPLaunch was used to automatically-configure TFTPD32
The final command - %~dp0tftplaunch.exe
/k /s:pxe /bf:\grldr /ps:10 /v - runs from the current
drive/path; it launches TFTPD32.EXE, keeps any windows open (/K), sets the subdirectory to
.\PXE (/S:PXE), sets the boot file to \grldr (/BF:\GRLDR), sets the DHCP pool size to x10
(/PS:10) and operates in verbose mode (/V). See this page for more information and
download http://tftplaunch.kerys.co.uk/
Optional Extras
If you want a "turnkey" autoboot CD
or DVD then you will need to add an autorun.inf file to the root
directory and the autorun icon as listed in the tree above. The autorun.inf will need to
contain.
[autorun]
icon=autorun\drivenet.ico
open=go.bat
Boot Order Analysis
The boot order for all of the above runs as follows: This boot method
avoids the "endless loop" of gPXE booting
PC Boots PXE (or gPXE) via ROM/BIOS or PXE/gPXE boot disk/USB stick or
CDROM
DHCP request is made and TFTP filename for our gPXE image is handed out
TFTP download of custom gPXE boot image file with gPXE script name
hard-coded to webserver via DHCP server address
gPXE downloads and runs gPXE script from webserver
Modules are loaded from webserver
Chain to O/S module and run O/S
Testing
Now boot run GO.BAT to launch the process and boot up your client PC in
PXE mode. You may need to go into the PC's BIOS and enable "Network Boot" as
well as changing the boot-order to place Network Boot before other media.
You should see the PC make it's initial PXE boot to TFTPD32. If you
switch to the "Log Viewer" tab then you should see your PC connect and obtain an
IP address. Next you will see it download the GRUB boot menu. At this point the GRUB boot
menu will appear on the PC's screen. A timeout is set at 3 seconds in the configuration
above, after which point the gPXE boot ROM file will be returned to the original PXE
client. Since this ROM file has a script embedded in it when it was compiled (as above),
this script will run on the HTTP server which is operating on the same PC as TFTPD32. In
our case this is the MicroApache server operating on port 8800.
You can use Tail for
Windows to watch the HTTP server log events in real time if
you're using the dynamic configuration option with MicroApache. If you've configured for
static configuration on MicroApache and are running with logs in .\LOGS in the server
folder then you can use TailCGI from a web browser with this command -
You can see the boot sequence illustrated in the images below -
Burning to CDROM, ISO or other media
You can use any freeware burner or ISO creator. I used the
excellent ImgBurn
Possible Amendments and Improvements
A boot menu for multiple options could be added by first chaining to say
GRUB and have GRUB then chain to one of several precoded gPXE images. These could be given
numbers, one for each menu "slot", say 1..10. Each of these "slots"
could map to a numbered gPXE boot script which could be fully modifiable to match the GRUB
boot menu. Bot the GRUB boot menu and gPXE scripts could be generated dynamically by say
PHP, PERL or CGI. The described process above simply covers or "maps" a single
script.
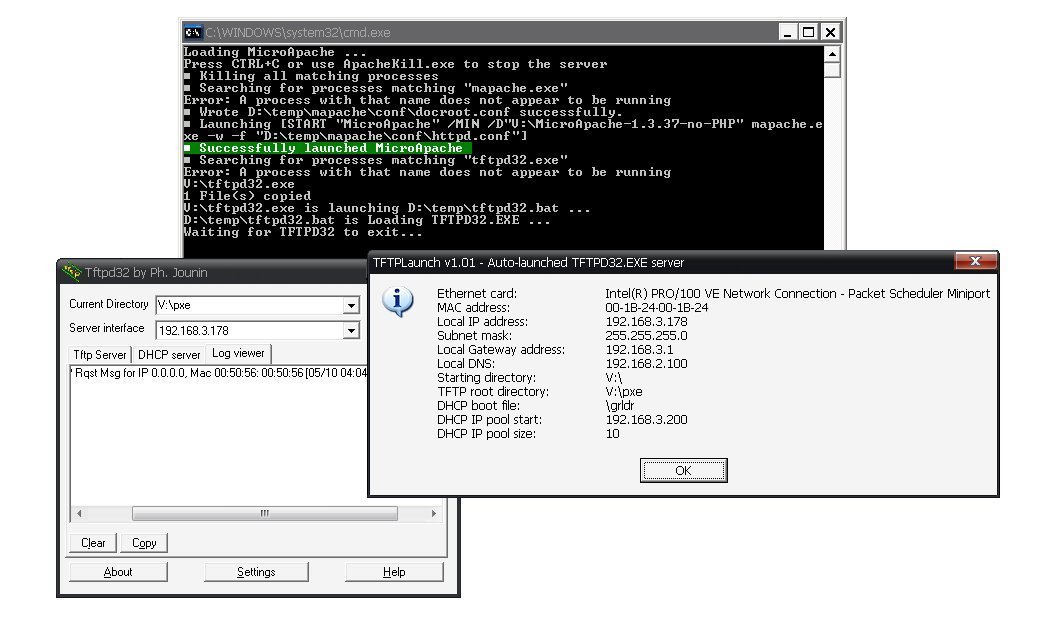
gPXE Chainboot Server Start Up - MicroApache running
on port 8800 and TFTPD32 launched by TFTPLaunch - Click for Larger Image
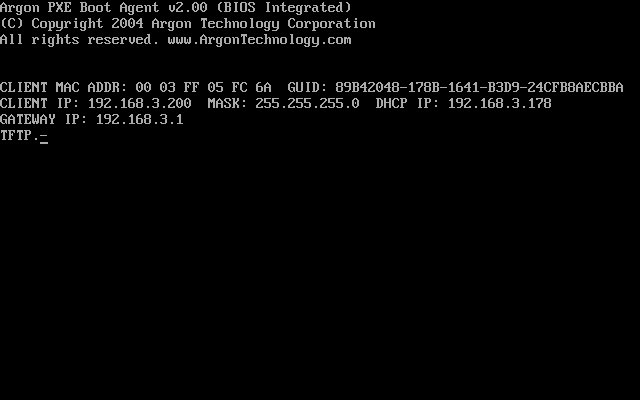
gPXE Chainboot Client PXE Start Up - Click for
Larger Image
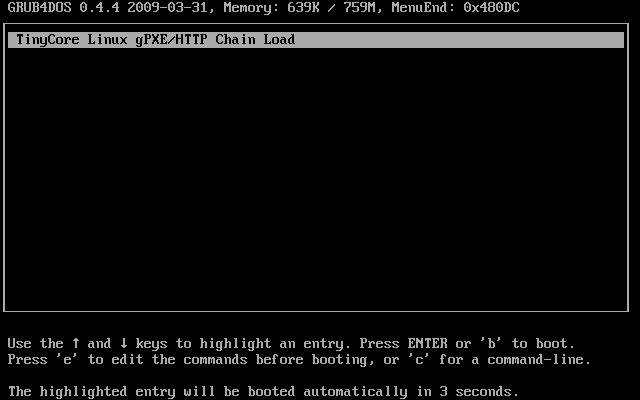
gPXE Chainboot Client Start Up - GRUB PXE Boot Menu
- Click for Larger Image
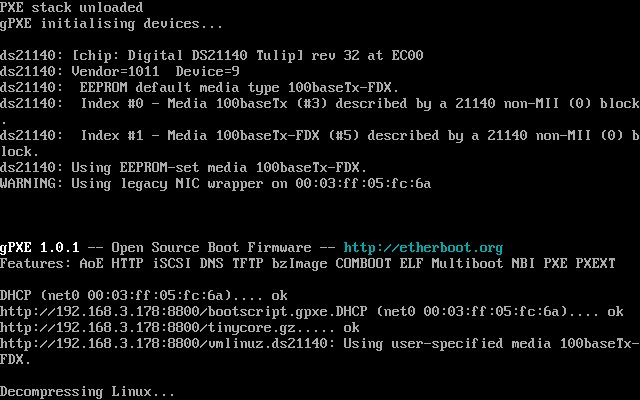
gPXE Chainboot Client gPXE Start Up - Click for
Larger Image
gPXE Chainboot Client Start Up - gPXE Loading
Tinycore Linux - Click for Larger Image
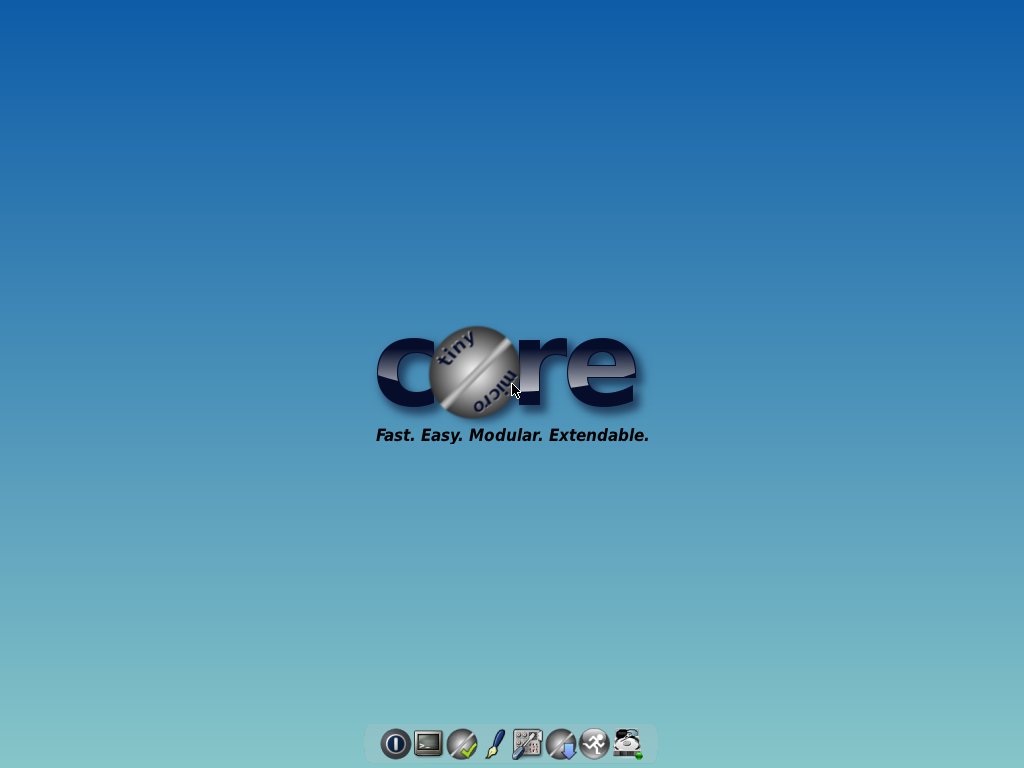
gPXE/HTTP Chainboot Client Start Up - Tinycore Linux
Loaded and Running via MicroApache HTTP server- Click for Larger Image
Astoundingly Tinycore actually WORKED and in a couple of clicks I had Firefox loaded and
browsing the web
gPXE Chainboot client startup using ISO CDROM image and Microsoft
Virtual PC. The brief pause at the start is where I had the VM paused ready to go - boot
resumes at 8 seconds - boot is completed at 53 seconds - actual total boot time is around
39 seconds (100mbps LAN)
This method is flexible in that the single gPXE boot ROM image can be
persuaded to boot a number of different configurations if these are edited or generated
dynamically on the local HTTP server using, say PHP or other scripting methods. The method
demonstrated uses a single, static script to load a single O/S but there's no reason why
dynamic menu scripts could not be generated without needing complex "tweaking"
of the gPXE boot agent.
The original idea came from this article but I found that the
boot sequence didn't work at all for me. The final "boot" command rebooted the
gPXE box instead of chaining to the loaded image file. I got better results using a
"chain" statement and chaining directly to a gpxe text-script hosted on the HTTP
server. This is better as the gPXE agent is generically hard-coded and the soft-coding is
done at the HTTP server end where it's most easily tweaked.
Since there's a 500mb limit on memdisk and my nLite XP setup CDs I use
for testing are about 1Gb then this method may be suitable for loading a 1Gb DOS-bootable
XP setup DVD which has been nLited. I've yet to try this method but am currently
experimenting with a basic XP distro and DOS 6.22/Smartdrv ISO.
I already have WinPE booting via PXE/GRUB memboot but booting via gPXE
may be another project as documented here
I also still have to get my nLite XP setup boot install working without
resorting to a primitive floppy DOS netdrive boot although this howto on creating a bootable
XP ISO/CD has given interesting results so far (although the nLite compilations are
bootable anyway). I envisage a non-booting autorun DVD with the above gPXE chainboot setup
and a complete with an nLite ISO (about 1.2Gb with unattended apps install) which the same
server config will serve up to PXE clients. I've still yet to resolve the STOP 0x7b
problem loading XP boot disks over PXE despite patching RAMDISK.SYS, perhaps this method
may help.
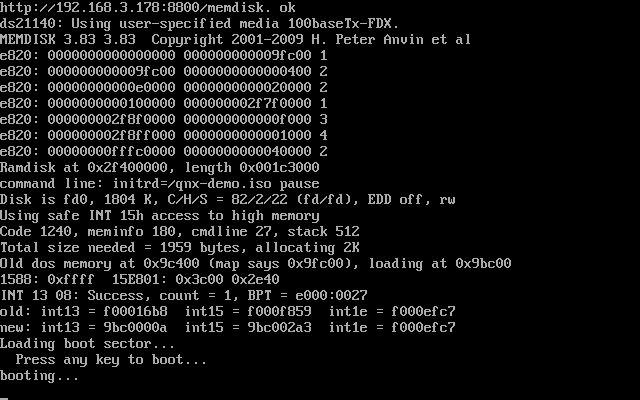
Memdisk ISO boot FAIL
Up to now I've been trying to use memdisk up to v1.83 with gPXE but
haven't had a single success in booting an ISO. I've tried half a dozen various good
bootable ISO images and verified the C/H/S values using testdisk_win on a mounted ISO
volume with WinImage. No matter what parameters are supplied memdisk simply hangs at boot
time. If anyone actually *has* got memdisk to work with gPXE (or even alone) booting ISO
images I'd be interested to see the config. Unfortunately memdisk is barely documented (if
at all) and the SysLinux site has been offline for some time now. I've cleaned a certain
amount of knowledge from looking at dozens of config examples. There are claims that more
recent versions of memdisk support el-torito CD booting and I've traced versions up to
v3.83, none of which can boot an ISO image.
Memdisk failing to boot yet another ISO image within gPXE (above).
This time the QNX distro ISO. In the example above the ISO image has been loaded
previously and is clearly recognised as fd0 with the correct size and detected CHS by
memdisk.
Possible Multiboot Configuration
It may be possible to multiboot by having several compiled versions of
gPXE with the static bootscript which calls bootscript<1..N>.gpxe with each
individual bootscript mapping to an alternate server distribution. say bootscript1.gpxe to
booscript10.gpxe. Memdisk could
perhaps be used as in this
method to load and run ISO images from the webserver